How To Repair A Shower Diverter
A malfunctioning shower diverter can quickly turn a simple shower into a frustrating experience. Whether water is not switching properly between the tub faucet and the showerhead or there is a noticeable leak, these issues are common in many households. Fortunately, repairing a shower diverter is often a manageable task that does not always require professional help.
Understanding how a diverter works and identifying the cause of the problem are key steps in fixing it effectively. With the right tools and a bit of patience, homeowners can restore proper water flow and avoid unnecessary expenses. This article provides a practical guide to repairing a shower diverter, helping you handle common issues with confidence and efficiency.
Understanding How a Shower Diverter Works
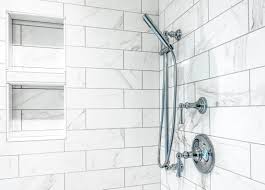
A shower diverter is a valve that controls the flow of water between the bathtub faucet and the showerhead. It allows users to switch between filling the tub and taking a shower with ease.
There are different types of diverters, including those built into the faucet, separate valves, and three-handle systems. Each type operates slightly differently but serves the same basic function of directing water flow.
For those exploring DIY shower diverter repair steps, understanding how the mechanism works is essential before attempting any repairs.
Identifying Common Shower Diverter Problems
Before starting any repair, it is important to identify the specific issue. Common problems include water leaking from the faucet while the shower is on, difficulty switching between modes, or reduced water pressure.
These issues are often caused by worn-out components, mineral buildup, or internal blockages. Over time, regular use can lead to wear and tear, affecting the performance of the diverter.
Recognizing the symptoms helps determine whether a simple cleaning or a full replacement is needed. Accurate diagnosis ensures that the repair process is effective.
Gathering the Necessary Tools and Materials
Having the right tools and materials makes the repair process smoother and more efficient. Common tools include a wrench, screwdriver, pliers, and replacement parts such as washers or cartridges.
It is also helpful to have cleaning supplies to remove any mineral deposits or debris that may be affecting the diverter. Using the correct tools prevents damage to the fixture and ensures a proper repair.
Preparing everything in advance saves time and reduces the likelihood of interruptions during the repair process.
Turning Off the Water Supply Safely
Before beginning any plumbing repair, it is crucial to turn off the water supply. This prevents leaks and ensures safety while working on the diverter.
The water supply can usually be shut off at the main valve or a dedicated valve for the bathroom. Once the water is turned off, it is a good idea to open the faucet to release any remaining pressure.
Taking this precaution helps avoid accidents and makes the repair process more manageable.
Removing and Inspecting the Diverter
The next step involves removing the diverter to inspect its condition. This may require unscrewing the faucet or accessing the valve behind a handle, depending on the type of diverter.
Carefully disassemble the components and examine them for signs of wear, damage, or buildup. Look for worn washers, corroded parts, or debris that may be causing the issue.
Inspecting the diverter thoroughly helps determine whether cleaning, repairing, or replacing parts is necessary.
Cleaning and Replacing Damaged Parts
Cleaning the diverter is often enough to resolve minor issues. Mineral deposits and debris can be removed using appropriate cleaning solutions, restoring proper function.
If parts are damaged or worn, they should be replaced with compatible components. This may include washers, seals, or the entire diverter mechanism.
Replacing faulty parts ensures long-term performance and prevents recurring problems. It is important to use high-quality replacements for durability.
Reassembling and Testing the System
After cleaning or replacing parts, reassemble the diverter carefully. Ensure that all components are properly aligned and securely tightened.
Once reassembled, turn the water supply back on and test the system. Check for leaks and ensure that the diverter switches smoothly between the faucet and the showerhead.
Testing confirms that the repair was successful and that the system is functioning as expected.
Preventing Future Shower Diverter Issues
Regular maintenance can help prevent future problems with the shower diverter. Cleaning fixtures periodically and addressing minor issues early can extend the lifespan of the components.
Avoiding excessive force when operating the diverter also helps prevent damage. Gentle handling ensures that the mechanism remains in good condition.
For those seeking additional guidance, home plumbing repair and maintenance tips provide useful insights into keeping bathroom fixtures functioning efficiently.
When to Seek Professional Help
While many diverter issues can be fixed with DIY methods, some situations may require professional assistance. Complex problems, such as internal pipe damage or severe corrosion, may be beyond basic repair.
A professional plumber can diagnose and resolve these issues effectively, ensuring that the system operates safely and reliably.
Knowing when to seek help prevents further damage and ensures that repairs are completed correctly.
Conclusion
Repairing a shower diverter is a practical and achievable task for many homeowners, especially when dealing with common issues such as leaks or reduced water flow. By understanding how the diverter works, identifying the problem, and following proper repair steps, it is possible to restore functionality without significant expense. Regular maintenance and careful handling can further prevent future issues, ensuring a reliable and efficient plumbing system. With the right approach, a simple repair can greatly improve everyday comfort and convenience in the home.